
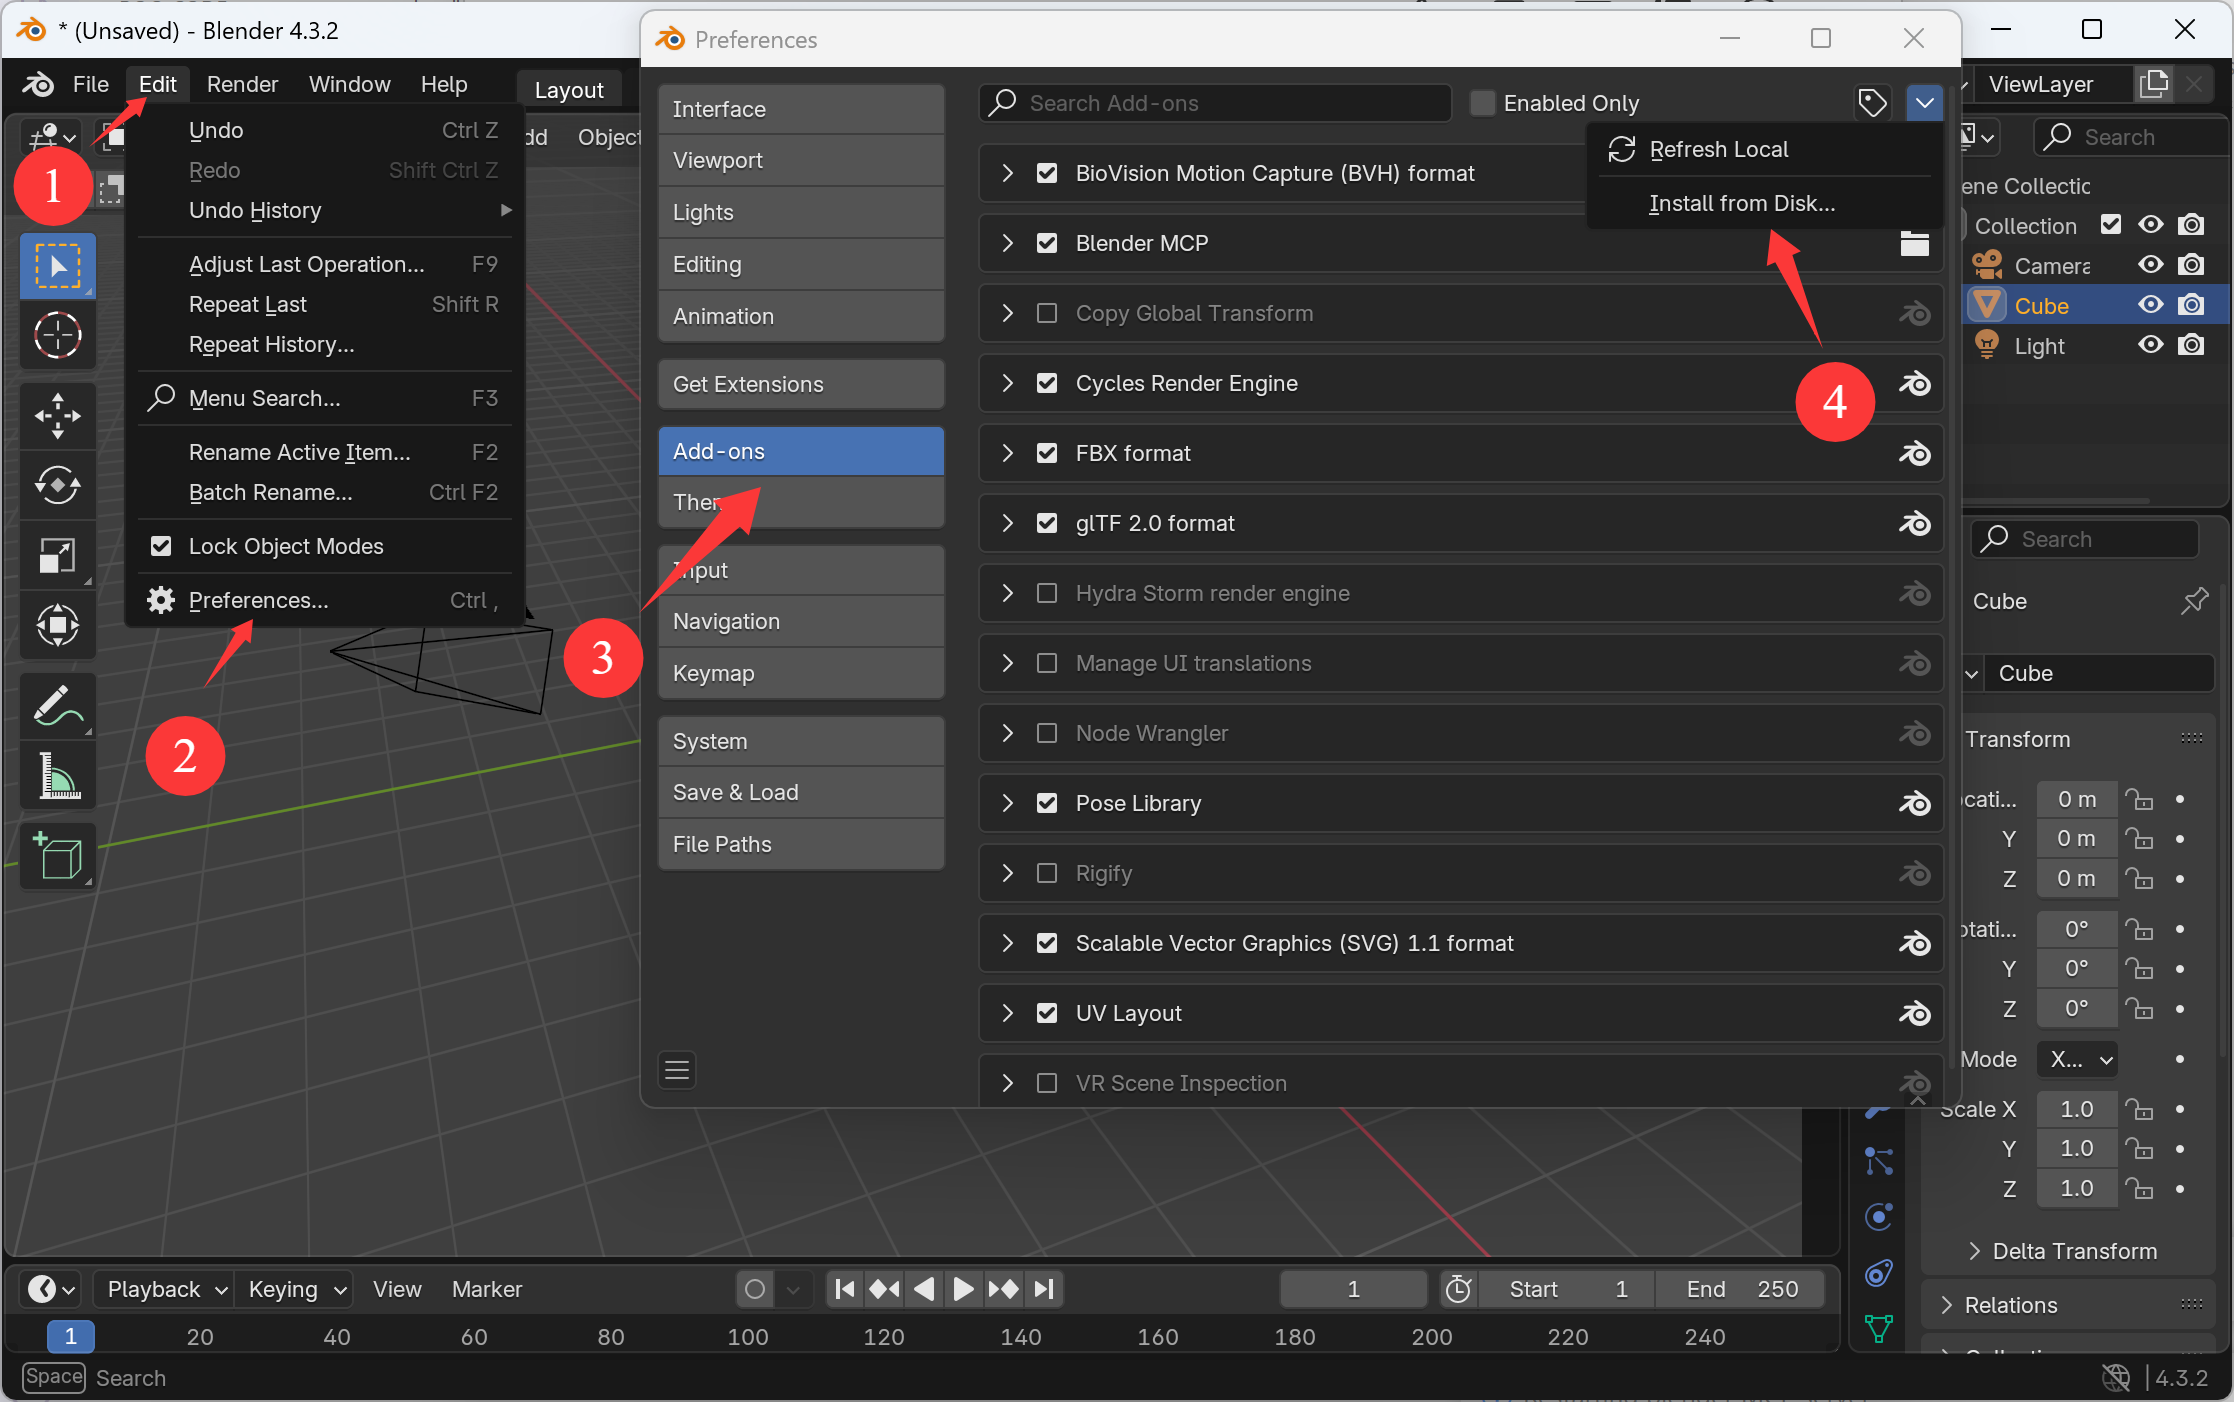


Windows 7 Ghost Spectre 32 Bit «360p»
🚀 Revive Your Old Hardware: Windows 7 Ghost Spectre 32-Bit (x86) Edition
Still holding onto that classic netbook or an aging desktop with limited RAM? If you’ve found modern Windows 10 or 11 too heavy for your 32-bit machine, it’s time to look at Ghost Spectre’s Superlite version of Windows 7.
While official support for Windows 7 has long passed, the Ghost Spectre modding community has breathed new life into the OS, stripping away the bloat and optimizing it for performance. Why choose the Ghost Spectre 32-Bit build?
Ultra-Low Resource Usage: Specifically designed to run smoothly on systems with 2GB of RAM or less.
Stripped Bloatware: Removes telemetry, unnecessary system apps, and background services that slow down older CPUs.
Ghost Toolbox: Includes a specialized tool to easily install essential drivers, runtimes, and browsers without the headache of searching for legacy links.
Gaming Optimized: Includes tweaks to reduce input lag and maximize FPS, making it a favorite for retro gaming builds. Key Features:
Compact Size: The ISO is significantly smaller than the standard retail version, saving precious disk space on old HDDs or small SSDs.
Native Drivers: Comes with many pre-integrated drivers to help get your hardware recognized immediately. Windows 7 Ghost Spectre 32 Bit
Modern Tweaks: Even though it’s Windows 7, it often includes updates that help with modern compatibility (where possible).
⚠️ A Note on Security:Because this is a modified, "cracked," or "lite" version of an end-of-life operating system, use it with caution. It is best suited for offline gaming, dedicated legacy software workstations, or secondary machines. Always back up your data before a clean install.
How to get started?You can typically find the latest builds via the official Ghost Spectre YouTube channel or community forums. Make sure to use a tool like Rufus to create your bootable USB!
Have you tried Ghost Spectre on your old gear yet? Let us know your performance benchmarks in the comments! 👇
#Windows7 #GhostSpectre #RetroComputing #TechTips #LowEndPC #GamingOS
Windows 7 Ghost Spectre 32-Bit: Revitalizing Low-End PCs Windows 7 Ghost Spectre 32-bit (often referred to as x86) is a heavily modified, "debloated" version of the classic Windows 7 operating system. Developed by the Ghost Spectre team, this version is specifically designed for old or low-end hardware that struggles with modern, resource-heavy operating systems like Windows 10 or 11. Why Choose the 32-Bit Version?
The 32-bit architecture is ideal for specific legacy use cases:
Low RAM Systems: It is highly recommended for systems with under 2GB of RAM. 🚀 Revive Your Old Hardware: Windows 7 Ghost
Older CPUs: It offers better compatibility with vintage processors that may not support 64-bit instruction sets.
Minimal Footprint: The 32-bit version typically demands fewer system resources and has a smaller disk footprint than its 64-bit counterpart. Key Features and Optimizations
Ghost Spectre transforms the standard Windows 7 experience into a high-performance environment by implementing several key changes:
Extreme Debloating: Removes unnecessary background processes, telemetry, and pre-installed "bloatware" to free up CPU and RAM.
Gaming Performance: Includes optimizations specifically for gaming, such as improved DirectX support and reduced system latency.
Ghost Toolbox: A custom command-line tool that allows users to easily install or remove features, such as web browsers, drivers, and visual tweaks.
Modern Updates Integrated: Versions like "Update 2" (Build 7601.25661) come pre-loaded with essential components like .NET Framework 4.7, DirectX SDK, and Visual C++ All-in-One runtimes.
Visual Customization: Includes unique themes like "DarkMatter Subspace" to give the legacy OS a modern aesthetic. Performance vs. Security Trade-offs Memory Limitation: The OS is limited to recognizing
While Ghost Spectre is significantly faster than stock Windows 7, users should weigh the benefits against potential risks:
It looks like you're asking about Windows 7 Ghost Spectre — specifically the 32-bit (x86) version.
Here’s what you need to know:
4.1 Immediate Risks
| Risk | Severity | Explanation | |------|----------|-------------| | No security updates | Critical | Windows Update is disabled. Post-2020 vulnerabilities (e.g., CVE-2021-34527 (PrintNightmare), CVE-2019-0708 (BlueKeep)) remain unpatched. | | Untrusted binary origin | High | No hash signed by Microsoft. ISO can contain embedded malware, backdoors, keyloggers. | | Admin rights default | High | Many Ghost Spectre builds disable UAC entirely – any process runs as admin. | | Missing security components | Medium | Windows Defender stripped. Windows Firewall is present but often disabled. |
3.1 Architecture: 32-Bit (x86)
- Memory Limitation: The OS is limited to recognizing approximately 3.5GB to 4GB of RAM. This makes the 32-bit version ideal for systems with 1GB or 2GB of RAM, where a standard Windows 10 installation would struggle.
- Application Compatibility: Supports older 16-bit and 32-bit applications that may not run on 64-bit versions of Windows.
6. Use Cases – Appropriate vs. Dangerous
System Requirements (32-bit)
Because it is "superlite," the requirements are lower than official Windows 7:
- Processor: 800 MHz or faster (Pentium 4, Atom N270, Celeron M)
- RAM: 512 MB minimum (2 GB recommended for browsing)
- Storage: 6 GB free space (after installation)
- Graphics: DirectX 9 capable device (WDDM 1.0)
- Firmware: Legacy BIOS or 32-bit UEFI
2. Background and Purpose
Report: Windows 7 Ghost Spectre (32-Bit Edition)
Performance Benchmarks: Real World
On a test machine (Intel Atom N270, 2GB DDR2, 60GB HDD), Windows 7 Ghost Spectre 32 Bit achieved:
- Boot time (cold): 19 seconds (vs 52 seconds for stock Windows 7 Home Premium).
- RAM usage at idle: 380 MB (vs 720 MB stock).
- Process count: 32 processes (vs 65 stock).
- Disk footprint: 5.2 GB (vs 12 GB stock).
On a slightly better machine (Core 2 Duo T7300, 3GB RAM), the OS feels snappy—Chrome portable (legacy version 109) runs with 3 tabs open before stuttering.