IExpress (iexpress.exe) is a useful Microsoft tool for creating self-extracting executables and SFX installers. It has been bundled with Windows since at least XP, and was available before that as part of the Internet Explorer Administration Kit.
I have attempted to answer many StackOverflow questions relating to IExpress. But after going away from it and coming back, I found I couldn’t remember many things. This is an attempt to document all that I know of this useful, yet limited, tool.
This document will not explain basic usage; it’s meant to keep track of important notes, and to explore the technical workings of IExpress and related utilities (eg makecab.exe).
Table of contents:
Modes of operation
IExpress can run in one of three modes:
Extract files and run an installation command. This is an “installer-builder” mode, similar to 7-Zip’s 7zS.sfx module or WinRAR’s SFX “temporary mode”.
Extract files only. This prompts a user for a destination directory, similar to 7-Zip’s 7z.sfx or 7zCon.sfx modules.
Create compressed files only (ActiveX Installs). A .cab file maker front-end. [I have no idea why it mentions “ActiveX Installs”, but I will find out.]
I am primarily interested in the first mode.
Installer packages (“type 1”)
General tips for IExpress installer packages
Use the x86 version of iexpress.exe
The IExpress output package executable has the same architecture as the version of iexpress.exe you run (ie, x86 or x64). On an x64 machine, by default, that will produce an x64-only IExpress package. When this package is executed on an x86 machine, it will fail, and display a nasty message about the file being incompatible.
You can avoid this by generating an x86 package. Execute the iexpress.exe which is in SySWOW64, eg:
Even if your installation requires x64, you can still display a friendlier error message to x86 users during the install process, perhaps in your installation script.
Specify cmd.exe for batch files
When executing a batch file, be sure to run it using cmd /c explicitly:
If you don’t do this, it will be run via command.com – yes, the 16-bit one! Depending on your system, one of the following will happen:
On systems that have a working NTVDM, you’ll really get a 16-bit “DOS” experience.
On x64 systems, your batch file will not execute at all. (wextract will say: “Error creating process <Command.com /c C:\Users\...\Temp\IXP000.TMP\file.bat>.”)
If you decide to specify the full path, I suggest you use C:\Windows\System32\cmd.exe /c. If the IExpress package is x86 (as recommended), the call to cmd.exe will be redirected to SysWOW64 on x64 machines.
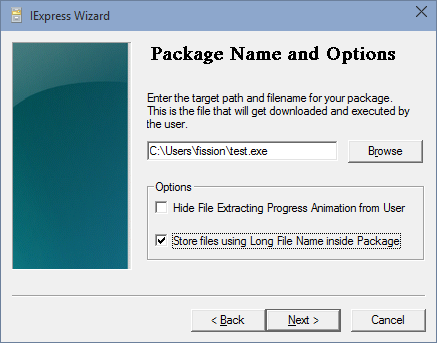
Always use long filenames
At the Package Name and Options screen, you are given the option Store files using Long File Name inside Package:
Always select this option! What filesystem are you using nowadays that doesn’t support more that 8.3 filenames?! :-)
A technical look at the IExpress process
Preventing intermediate file deletion
iexpress.exe appears to use the location of your SED file for its temporary files. To inspect the intermediate results, I applied a deny ACE to this directory:
The setup?.exe files are just copies of Notepad. Note that they have to have different names, despite coming from different source directories – more on this later.
Essentially this extracts the files to a temporary directory, then runs cmd.exe and waits.
The IExpress build process
Using procmon, one can see exactly the process that IExpress uses. Start Process Monitor, then run IExpress:
makecab.exe reads the DDF file and creates three files: ~test.CAB, ~test_LAYOUT.INF and ~test.RPT.
During this process, makecab creates a series of files in %temp%, with names like cab_pid_N and inf_pid_N, where pid is the process ID of makecab, and N is a sequential integer.
It also creates some zero-byte files C:\ixptest\CABnnnnn.TMP, eg CAB00356.TMP, where nnnnn is a right-padded number beginning with the process ID of makecab.
iexpress.exe reads the RPT file, and deletes the DDF, INF and RPT files (without having examined the INF file).
iexpress.exe copies wextract.exe into C:\ixptest\test.exe.
iexpress.exe merges test.exe and ~test.CAB into a new, temporary file C:\ixptest\RCX441A.tmp.
During this process, it seems some of the executable part (ie the “wextract portions”) of the temp file are modified, possibly to adjust for things like the new executable length.
Finally, iexpress.exe renames RCX441A.tmp to C:\ixptest\test.exe, overwriting it. It deletes the ~test.CAB file.
The CAB file
7-Zip has this to say about the generated ~test.CAB file:
This file is used by makecab.exe. Its directives are documented elsewhere [1][2], so I won’t go into much detail. Suffice it to say that this file generates a ‘plain’ CAB file.
Interestingly, you can see the “shell” of this file in the .text section of iexpress.exe:
.Set CabinetNameTemplate=%s
Note the %s C-style (printf) substitution there.
The INF file
;*** BEGIN **********************************************************
;**                                                                **
;** Automatically generated on: Mon Sep 07 22:01:32 2015           **
;**                                                                **
;** MakeCAB Version: 10.0.9800.0                                 **
;**                                                                **
;*** BEGIN **********************************************************


[SourceDisksNames]
1=Application Source Media,C:\ixptest\~test.CAB,0

[SourceDisksFiles]
setup1.exe=1,,215040,c1fe9638
setup2.exe=1,,215040,c1fe9638
;*** END ************************************************************
;**                                                                **
;** Automatically generated on: Mon Sep 07 22:01:32 2015           **
;**                                                                **
;*** END ************************************************************
The key feature of MakeCAB is that it takes a set of files and produces a disk layout while at the same time attempting to minimize the number of disks required.
This hearkens back to the days when products were shipped on floppy diskettes. Remember Windows 95 (13 disks), Windows NT 3.1 (22 disks), or Windows 98 (38 disks!)?
7-Zip shows us how wextract.exe was modified when forming test.exe:
C:\ixptest>7z l test.exe

7-Zip [64] 9.20  Copyright (c) 1999-2010 Igor Pavlov  2010-11-18

Listing archive: test.exe

--
Path = test.exe
Type = PE
CPU = x86
Characteristics = Executable 32-bit
	[...snip...]
----
Path = .rsrc\RCDATA\CABINET
Size = 146334
Packed Size = 146334
--
Path = .rsrc\RCDATA\CABINET
Type = Cab
Method = LZX
Blocks = 1
Volumes = 1

   Date      Time    Attr         Size   Compressed  Name
------------------- ----- ------------ ------------  ------------------------
2015-01-20 04:52:54 ....A       215040               setup1.exe
2015-01-20 04:52:54 ....A       215040               setup2.exe
------------------- ----- ------------ ------------  ------------------------
                                430080       301056  2 files, 0 folders
Looks like the CAB was actually added as an RCDATA resource named CABINET. Neat!
That’s a somewhat different approach than 7-Zip’s 7zS.sfx, in which one simply gloms the installer config file and 7z archive onto the end of the executable.
The install program environment
Here is what the environment looks like during the execution of the install program:
The current directory is C:\Users\user\AppData\Local\Temp\IXP000.TMP.
Note that the cmd.exe is actually the x86 (32-bit) one, since the x86 version of IExpress generated an x86 executable. If you really need an x64 cmd.exe, you can run %SystemRoot%\Sysnative\cmd.exe from your x86 cmd.
Quick tasks
Persisting files
A question that gets asked a lot is, “How can I prevent the IExpress temporary files from being deleted?” or “How can I extract the files to a specific [predetermined] location?”
The problem is that the extracted files from a “type 1” installer package get cleaned up after the install program is finished, and the “type 2” installer prompts the user for the extraction location. My answer on Stack Overflow is a fairly complete response to this.
Essentially, you should create a installer-type package, and include in it a script of some sort (eg, a batch file) that copies the files from the temporary location (eg %temp%\IXP000.TMP) to a more permanent location of your choosing, perhaps something like:
@echo off
xcopy /y * "%ProgramFiles%\MyProgram\"
del /f "%ProgramFiles%\MyProgram\copyfiles.bat"
Subdirectories
“Can IExpress-generated cabinets contain subdirectories?” or “How can I preserve my folder structure?”
The short answer is: no. To understand this, it’s useful to know how the CAB file within the package is generated.
As seen above, IExpress generates a DDF file (based on your SED file) which contains a series of directives followed by a list of full pathnames of files to include. But no matter the source location, the files are all placed into the ‘root’ of the CAB file*, as no destination directives were specified. This also creates a requirement that all files be named uniquely (irrespective of their source location).
If we could somehow intercept the DDF file and modify it before makecab.exe ran, we could add subdirectories by adding new directives. The end of the DDF file could look something like:
If we run makecab.exe directly on a file like this, we can see the paths in the generated CAB file:
C:\ixptest>7z l "~test.CAB" | find "A"
Listing archive: ~test.CAB
Path = ~test.CAB
   Date      Time    Attr         Size   Compressed  Name
2015-01-20 04:52:54 ....A       215040               foo\setup1.exe
2015-01-20 04:52:54 ....A       215040               bar\setup2.exe
But I don’t really see a convenient way of modifying the DDF file, as it exists for only a few seconds.
You could use the same method as described in Persisting files above: in your install script, move the files to their appropriate subdirectories. Obviously this would get increasingly tedious as the number of files increases.
[* CAB files don’t really have “directories”, per se, but are nevertheless supported by several utilities, including 7-Zip.]
Disabling compression
If the files you’re including are already compressed, you might not want to compress them within the CAB archive. To do that, add Compress=0 to your SED file, anywhere in the [Options] section:
[Options]
Compress=0
You can use 7-Zip to check whether it’s compressed. For a ‘typical’ IExpress file, the Method will be LZX:
C:\ixptest>7z l test.exe
[...]
Path = .rsrc\RCDATA\CABINET
Type = Cab
Method = LZX
Blocks = 1
Volumes = 1
[...]
Whereas for an uncompressed CAB, the Method will be None:
C:\ixptest>7z l test.exe
[...]
Path = .rsrc\RCDATA\CABINET
Type = Cab
Method = None
Blocks = 1
Volumes = 1
[...]
[ This SED option causes the Compress directive to be changed in the DDF file to: .Set Compress=0 ]
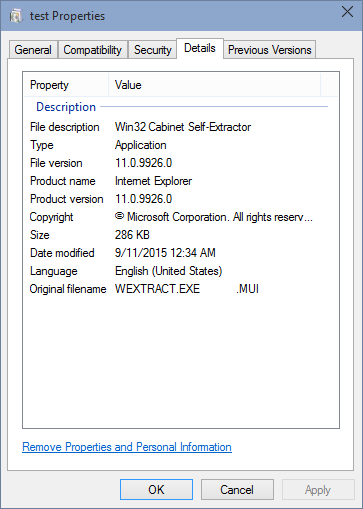
Overriding file version details
As the generated package is based on wextract.exe, the Details pane will look something like this:
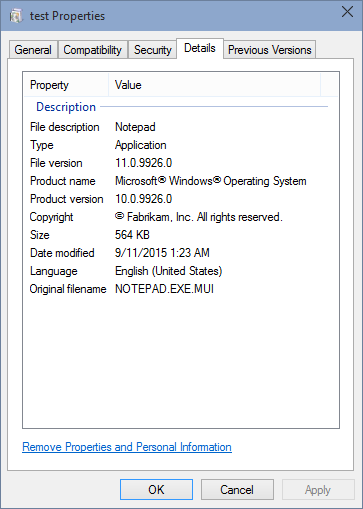
You can override some of those fields using a custom definition in your SED file. You need to define the VersionInfo option in the [Options] section, then add the new section.
Here is an example that takes the data from notepad.exe:
However I’m rather inclined to agree with the (unnamed) Microsoft representative who said:
“I still do not see any security vulnerability
here. I can see an escalation of UAC privileges, but as has
been documented on numerous occasions, UAC is not considered
to be a security boundary, so such an escalation is not
considered to be a security vulnerability.”
In any case, let us examine these claims to see how they came about.
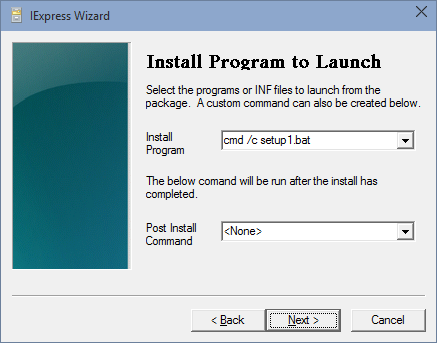
Install program launch behaviour
Instalar Lumion 11 Instant
Para instalar de manera correcta y preparar tu equipo para un rendimiento óptimo, sigue estos pasos esenciales basados en las guías oficiales de Lumion Support 1. Verificación de Requisitos del Sistema
Antes de comenzar, asegúrate de que tu PC cumple con lo siguiente para evitar fallos durante la instalación: Sistema Operativo: Windows 10 versión 1809 o superior. Tarjeta Gráfica (GPU):
Es el componente más importante. Debe ser una tarjeta dedicada (NVIDIA o AMD) con al menos 6 GB de VRAM . Las gráficas integradas (Intel HD) no son compatibles. Memoria RAM: Se recomiendan
como mínimo, aunque 32 GB es lo ideal para escenas complejas. Espacio en Disco: Necesitarás al menos 40 GB de espacio libre en una unidad SSD. 2. Preparación del Entorno
Para evitar errores de "bloqueo" por parte del sistema, prepara lo siguiente: Actualiza Windows:
Instala todas las actualizaciones pendientes y reinicia tu PC. Controladores de Video:
Descarga e instala los últimos drivers para tu tarjeta en los sitios oficiales de Excepciones de Antivirus:
Agrega el instalador de Lumion a la lista de exclusiones de tu antivirus o Windows Security para evitar que se bloqueen archivos necesarios durante la extracción. 3. Proceso de Instalación What kind of computer does Lumion 11 need? - Knowledge Base
Para instalar , el proceso oficial se realiza a través de tu cuenta de usuario en el portal de Guía de Instalación Básica Registro de Licencia : Inicia sesión en tu Cuenta de Lumion
y asegúrate de que tu clave de licencia de la versión 11 esté registrada.
: Haz clic en el botón "Download Product" para obtener el gestor de descarga (Installer). Ejecución
: Abre el instalador desde el Explorador de Windows. Si el sistema solicita un código de activación, encuéntralo en tu panel de usuario de Lumion. Requisitos Técnicos : Asegúrate de tener al menos 30 GB de espacio libre
en tu unidad C:\ para los archivos temporales y suficiente espacio adicional en el disco de destino. También se recomienda activar la Programación de GPU acelerada por hardware en la configuración de Windows para un mejor rendimiento. Lumion 11: Feature Highlight
Si estás armando un resumen o "feature" sobre esta versión, estas son las funciones estrella que definen a Lumion 11: Vistas Ortográficas
: Permite crear planos y secciones con color y vida directamente desde el programa, eliminando la necesidad de software adicional para presentaciones técnicas. Fuego Volumétrico
: Añade calidez a interiores y exteriores con un efecto de fuego realista que proyecta luz ambiental. OpenStreetMap con Mapas Satelitales
: Ahora incluye mapas detallados de terrenos, ríos y tierras agrícolas de todo el mundo con un solo clic. Fases Animadas
: Una herramienta ideal para mostrar el proceso de construcción de un diseño mediante el flujo y conexión de sus partes. Gotas de Lluvia
: Los materiales de vidrio ahora pueden mostrar gotas de lluvia deslizándose, lo que añade un nivel de realismo atmosférico superior. ¿Te gustaría saber más sobre cómo configurar las Vistas Ortográficas o algún detalle técnico sobre los requisitos de hardware AI responses may include mistakes. Learn more Lumion 11.0: Release notes
Aquí tienes una guía completa y optimizada para la instalación de Lumion 11, enfocada en asegurar que el software rinda al máximo en tu equipo. instalar lumion 11
Guía Completa: Cómo Instalar Lumion 11 y Optimizar su Rendimiento
Lumion 11 se ha consolidado como una de las herramientas de renderizado en tiempo real más potentes para arquitectos y diseñadores. Su capacidad para transformar modelos 3D en visualizaciones fotorrealistas en cuestión de minutos es inigualable. Si estás listo para dar el salto, aquí te explicamos paso a paso cómo instalar Lumion 11 de forma correcta. 1. Requisitos previos: ¿Tu PC está listo?
Antes de proceder con la descarga, es vital verificar si tu hardware puede soportar la carga gráfica de Lumion 11. Este software depende casi exclusivamente de la tarjeta gráfica (GPU).
Mínimo: GPU con puntuación G3DMark de 7,000 o superior (ej. GTX 1650), 16 GB de RAM y 40 GB de espacio en disco.
Recomendado: GPU con puntuación G3DMark de 14,000 o superior (ej. RTX 3060 / RTX 2070 Super) y 32 GB de RAM.
Sistema Operativo: Windows 10 de 64 bits (versión 1809 o superior). 2. Cómo descargar e instalar Lumion 11 paso a paso
Si has adquirido una licencia o estás probando la versión trial, sigue estos pasos: Paso 1: Descarga del instalador
Una vez realizada la compra o registro en el sitio oficial de Lumion, recibirás un correo electrónico con un enlace de descarga para el Lumion Download Manager. Ejecuta este archivo para comenzar la descarga de los archivos de instalación (que suelen ocupar unos 18-20 GB). Paso 2: Ejecución del Setup
Cuando la descarga finalice, abre la carpeta de destino y haz clic derecho en el archivo Lumion_11_0_Download.exe (o similar) y selecciona "Ejecutar como administrador". Paso 3: Selección de la ruta
El instalador te preguntará dónde deseas guardar los archivos del programa. Se recomienda utilizar un disco de estado sólido (SSD) para reducir drásticamente los tiempos de carga del software y las librerías. Paso 4: Finalización y Primer Inicio
Una vez completada la barra de progreso, haz clic en "Finalizar". Al abrir Lumion 11 por primera vez, el programa realizará un "Benchmarking" (prueba de rendimiento) para evaluar la potencia de tu PC y ajustar la calidad de la previsualización. 3. Novedades clave en Lumion 11
Instalar esta versión te da acceso a funciones que mejoran la narrativa visual de tus proyectos:
Vistas Ortogonales: Perfectas para crear planos técnicos con texturas y sombras realistas.
Fase de Animación: Permite mostrar el proceso de construcción de tu diseño de forma cinematográfica.
Líneas de Lluvia en Cristales: Un detalle atmosférico que añade un realismo emocional increíble a los renders interiores.
Fuego Volumétrico: Ideal para chimeneas y fogatas con una iluminación dinámica mejorada. 4. Solución de problemas comunes al instalar
Bloqueo del Antivirus: En ocasiones, el firewall o el antivirus pueden bloquear la conexión de Lumion con los servidores de licencias. Asegúrate de añadir Lumion a la lista de exclusiones.
Controladores de Gráfica: Si el programa se cierra inesperadamente al iniciar, actualiza los drivers de tu tarjeta NVIDIA o AMD desde su web oficial. No confíes solo en Windows Update.
Falta de espacio: Recuerda que, además de la instalación, Lumion genera archivos temporales pesados mientras renderizas. Mantén siempre al menos 20 GB libres en tu disco principal. Conclusión Para instalar de manera correcta y preparar tu
Saber instalar Lumion 11 es el primer paso para revolucionar tus presentaciones arquitectónicas. Con una interfaz intuitiva y una biblioteca de objetos inmensa, este software permite que te concentres en el diseño mientras él se encarga de la magia visual.
¿Te gustaría que profundizara en los pasos para configurar el LiveSync con Revit o SketchUp una vez instalado? Dime qué software de modelado usas habitualmente.
Installing Lumion 11 involves a structured process of verifying system requirements, downloading the installation files via a registered account, and applying necessary updates or hotfixes. Note that Lumion 11 is no longer officially supported by the manufacturer. 1. System Requirements & Preparation
Before starting the installation, ensure your hardware meets the minimum or recommended specifications to avoid crashes or performance issues.
Operating System: Windows 10 or 11 (64-bit) with the most recent updates installed.
Graphics Card (GPU): A dedicated NVIDIA or AMD GPU with at least 6GB of VRAM is required for 4K rendering. For optimal performance, a GPU with over 20,000 PassMark points is recommended.
System RAM: Minimum of 16GB, though higher is better for complex scenes.
Storage: At least 40GB of free SSD space for the installation and user data.
GPU Settings: It is recommended to enable Hardware-accelerated GPU scheduling in Windows Settings for improved performance. 2. Download and Installation Process Follow these steps to install the software correctly:
Register License: Log in to your Lumion Account and register your version 11 License Key if you haven't already.
Download Installer: Click the Download Product button in your account to get the Lumion Download Manager.
Run as Administrator: Right-click the downloaded .exe file and select Run as Administrator to ensure the installer has permission to create necessary folders.
Activation: Enter the Activation Code from your Lumion Account if prompted. This code is required for the download process to complete.
Installation Path: The default location is C:\Program Files\Lumion 11.0. You can choose a different drive during setup if you lack space on your C: drive. How do you analyze a Diagnostics Report? - Knowledge Base
Installing Lumion 11: A Step-by-Step Guide
Lumion 11 is a powerful 3D rendering software that allows architects, designers, and artists to create stunning visualizations and animations. If you're excited to try out Lumion 11, here's a step-by-step guide to help you install it on your computer.
System Requirements
Before you start the installation process, make sure your computer meets the minimum system requirements for Lumion 11:
Go to the Lumion website (www.lumion.com) and click on the "Download" button.
Select the correct version (Lumion 11) and click on the download link.
Save the installer file to your computer (e.g., "Lumion_11_Setup.exe").
Installing Lumion 11
Once you've downloaded the installer file, follow these steps:
Run the installer file (Lumion_11_Setup.exe) and follow the prompts to begin the installation process.
Accept the license agreement and select the installation location.
Choose the components you want to install (e.g., Lumion 11, Lumion Pro, etc.).
Click "Install" to start the installation process.
Activating Lumion 11
After installation, you'll need to activate Lumion 11 using a valid license key:
Launch Lumion 11 and click on "Activate" in the top-right corner.
Enter your license key (or sign in with your Lumion account).
Follow the prompts to complete the activation process.
Tips and Tricks
Make sure to close any other resource-intensive programs during the installation process.
If you encounter any issues during installation, try running the installer as an administrator.
Lumion 11 requires a dedicated graphics card with at least 4 GB of VRAM.
Installation is more than just a technical step; it is the bridge between a static architectural concept and a living, breathing visualization. Lumion 11 was designed to streamline this transition, focusing on making professional rendering an effortless part of the architectural workflow. The Technical Foundation
A successful installation begins with hardware. Lumion 11 requires a robust environment to function, specifically:
Operating System: At least Windows 10 version 1809. Updating to version 2004 or newer is highly recommended to enable "Hardware-accelerated GPU scheduling," which boosts performance.
Storage: You need approximately 30GB to 50GB of free space on your C: drive even after installation, as Windows and Lumion both require substantial "breathing room" for temporary files.
Hardware: The graphics card is the most critical component. For Lumion 11, a GPU with at least 8,000 to 20,000 PassMark points and significant VRAM (ideally 8GB+) is necessary for a smooth experience. The Installation Process What kind of computer does Lumion 11 need? - Knowledge Base
¿Puedo tener Lumion 10 y Lumion 11 en el mismo PC?
Sí. Se instalan en carpetas separadas (Lumion 10 y Lumion 11). No hay conflicto, pero ocuparán el doble de espacio (~50 GB).
Step 0: The "Reality Check" (System Requirements)
Lumion is not like Word or Excel. It demands a powerful graphics card. Do not skip this step.
Heads up: Lumion 11 does not work on Macs (even with Parallels) unless you install Windows via Boot Camp. It also requires Windows 10 (build 1809 or later) or Windows 11.
Step 4: Launching & Activating
After installation, double-click the Lumion 11 desktop icon.
A login window will appear. Enter your Lumion Portal credentials.
Activation: The software will check your license. If you have a purchased license key, enter it now. If you are on a trial, click "Start trial."
Firewall Alert: If Windows Firewall asks for permission, click "Allow access" on both Public and Private networks.
Paso 4: Selección de la carpeta de destino
Importante: No instale Lumion en una carpeta protegida como Archivos de programa (x86).
Recomendación: Cree una carpeta directamente en la raíz del disco, por ejemplo: C:\Lumion 11\.
Haga clic en "Examinar" y seleccione su ubicación.
Step 2: Running the Installation Wizard
Once the download is complete, follow these steps to proceed with the setup:
Locate the File: Find the Lumion_11_0_LUMIONPRO.exe (or similar) file in your Downloads folder.
Run as Administrator: Right-click the file and select "Run as administrator." This ensures the installer has the necessary permissions to write files to your system drives.
User Account Control: If a Windows security prompt appears asking for permission to make changes, click "Yes."
Log in with the account that has your license attached (or start your 14-day free trial).
Click "Download Lumion 11".
You will receive a large .exe file (approximately 18-20 GB). Yes, it’s huge. A stable internet connection is mandatory.
Common Installation Errors (And How to Fix Them)
IExpress and UAC Installer Detection
UAC Installer Detection attempts to detect whether an application that isn’t UAC-aware needs elevation.
Having neither the time nor the interest to examine old versions of IExpress (say, anything older than the version bundled with Windows 7), I can’t say what the behaviour of ‘old’ wextract.exe is with regards to UAC.
However, I can see that relatively recent wextract.exe contains a manifest with the following:
According to MSDN, asInvoker means: The application will run with the same permissions as the process that started it. In other words, no UAC elevation will be requested for IExpress-generated packages (by default). Of course, the executable inside the package might itself request elevation.
Stefan Kanthak’s IExpress vulnerability
Now that I’ve explored the two mechanisms in play, I’ll summarize the vulnerability mentioned by Kanthak:
Download or create an IExpress package which triggers UAC’s Installer Detection.
Probably this requires an old version of IExpress, as new versions of wextract.exe seem to have a manifest that would prevent this.
One such file that exists already is CAPICOM-KB931906-v2102.exe. The wextract.exe for that file has a date of 2004-08-03 23:01:37, and an OS Version of 5.1 (ie, Windows XP/2003).
Place an executable in the same directory as the IExpress package, and give it the same name as its install program (msiexec.exe in this case).
The author supplies a very handy program called sentinel.exe for this purpose (just rename it to, eg, msiexec.exe).
Execute the IExpress package. UAC prompts for elevation based on the details of the IExpress package itself; but when you elevate, the ‘fake’ msiexec.exe executes from the same directory, rather than from System32. And it is executing with elevated privileges.
Of course, the user still had to consent to the UAC elevation, so it’s not a ‘bypass’, strictly speaking. Essentially it’s unexpected behaviour – you’re ‘piggybacking’ off of a UAC elevation for a different program.
The upshot
If you’re concerned that someone might try to hijack your IExpress package for nefarious purposes, you can either:
Specify the install program to be an executable that you bundled in your install package; or
Specify the install program by full path to the executable.
Obviously the latter is difficult if you want to maintain good compatibility (eg, Windows not being installed in C:\Windows).