How To Add - Mods On Eaglercraft
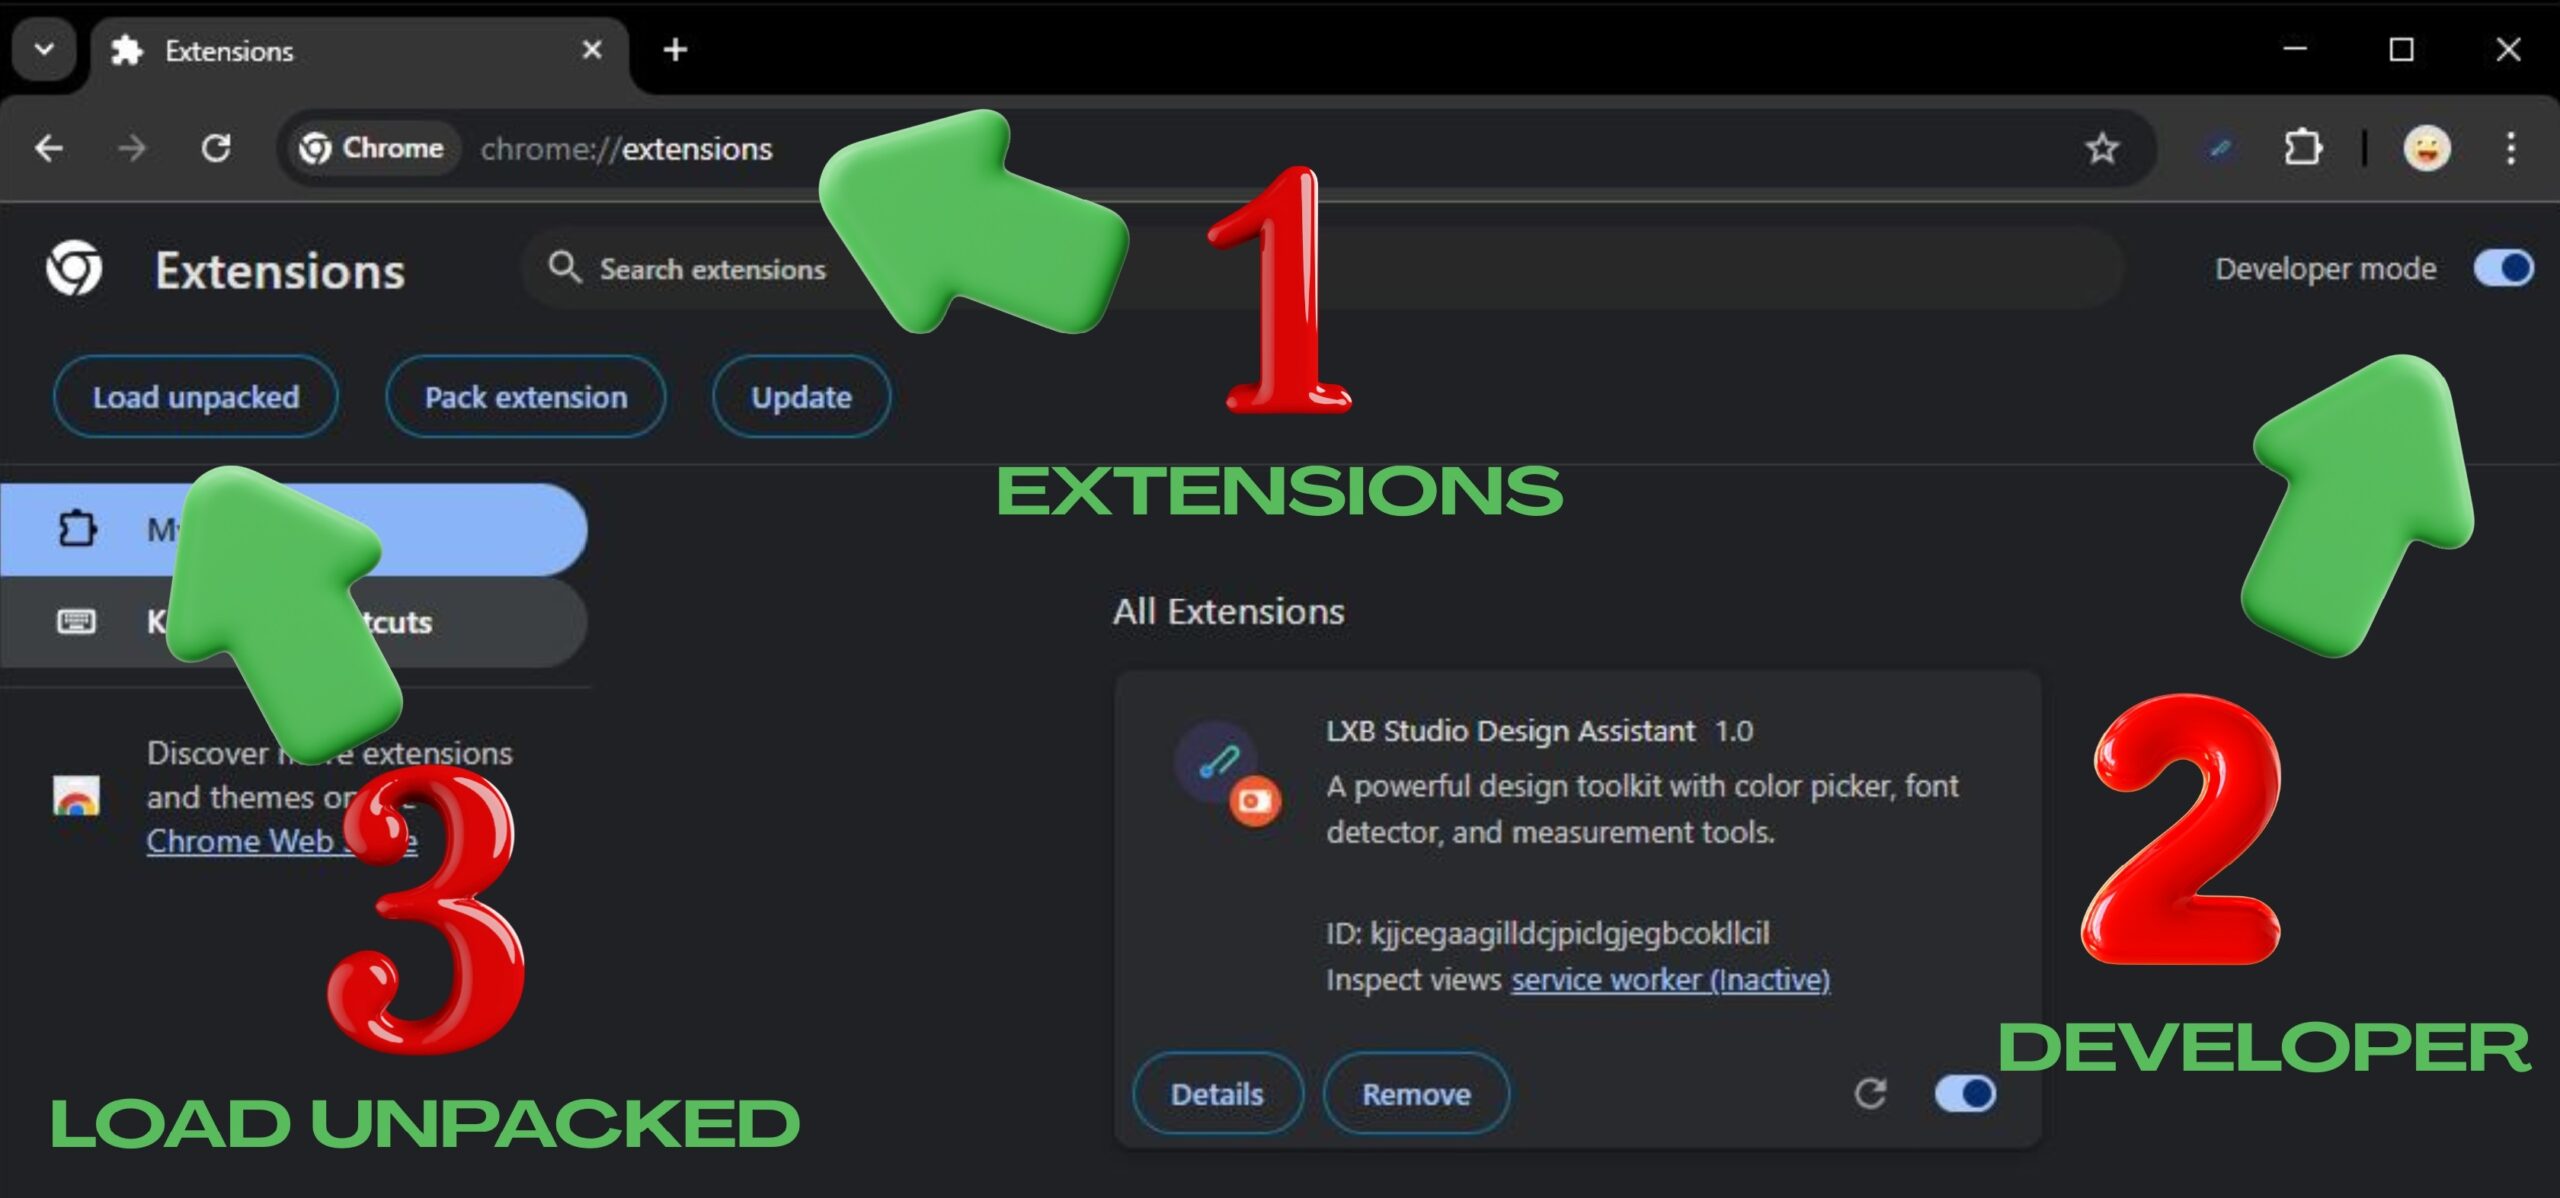
Adding mods to Eaglercraft is different from standard Minecraft because it runs in a web browser. Instead of traditional .jar files, Eaglercraft uses EaglerForge, a specialized mod loader designed for this environment. Method 1: Using EaglerForge (Recommended)
EaglerForge is the primary way to load mods into the browser-based client.
Obtain a Modded Client: Download or access an Eaglercraft client that has EaglerForge pre-injected.
Access the Mods Menu: In the main menu or pause menu, click the "Mods" button. Upload the Mod:
Click "Upload" to select a mod file (usually a .js or .epk file) from your computer.
Alternatively, click "Add New" to paste a direct URL to a mod script.
Confirm and Restart: Once added, the mod should appear in your list. You may need to refresh the page or click "Done" to activate it. Method 2: Using Custom "Enhanced" Clients
If you don't want to install mods manually, many players use pre-built custom clients that come with built-in mods like shaders, performance boosts, and HUDs.
PixelClient: Includes unique optimizations and advanced mod support. AstraClient: Focused on performance with a sleek UI.
FlamingClient: A feature-rich client that includes built-in shaders and GUI customization tools. Available Mod Types
Mods for Eaglercraft are typically JavaScript-based and offer features similar to Java edition mods:
Quality of Life: StatsHUD, Keybind (hold), and SemiAutoLogin.
Visuals: Shaders, Blur (for unfocused screens), and FreshEaglerUI. Utilities: WorldEdit, Xray, and GrappleHook.
These tutorials provide visual steps for setting up mod loaders and using custom modded clients: How to install eaglerforge(Mod loader for eaglercraft) 76K views · 1 year ago YouTube · red stick (radmanplays) How to put mods in eaglecraft 1.12.2 9K views · 8 months ago YouTube · Aventuras Minecraft ⚔
Adding mods to Eaglercraft is different from standard Minecraft because it runs in a browser. You cannot use standard Forge or Fabric .jar files. Instead, you must use a specialized tool called EaglerForge or a modded client that supports .js (JavaScript) scripts. 🛠️ How to Add Mods Using EaglerForge
EaglerForge is the primary way to inject custom code into Eaglercraft.
Get a Modded Client: Open a compiled Eaglercraft client that has EaglerForge built-in.
Access the Mod Menu: Click the "Mods" button found on the main menu or the pause menu. Install the Mod:
Via URL: Click "Add New" and paste the link to a raw mod script (e.g., from EaglerForge's GitHub).
Via Upload: Click "Upload" to select a .js mod file directly from your computer.
Restart/Apply: The mod will typically load immediately or after you click "Done". 🎨 Adding Resource Packs & Shaders how to add mods on eaglercraft
If you just want to change how the game looks, you don't need a modded client.
Resource Packs: Go to Options → Resource Packs. You can drag and drop a standard Minecraft 1.8-compatible .zip file directly into the browser window.
Shaders: EaglercraftX 1.8 has built-in PBR shaders. You can enable them in Options → Shaders. Custom shaders for Eaglercraft are usually bundled inside specific resource packs. ⚠️ Important Limitations
No .jar Files: Standard Minecraft mods from sites like CurseForge will not work.
Limited Library: Only a few mods (like WorldEdit or cosmetic "Hat" mods) are currently stable for Eaglercraft.
Browser Storage: Mods and resource packs are stored in your browser's local cache. If you clear your browser data, they will be deleted.
💡 Pro-Tip: If you're a developer, you can create your own mods by writing JavaScript that uses the ModAPI. You can find documentation and an example mod on the EaglerForge Guide. If you'd like, let me know:
Which version of Eaglercraft are you using (e.g., 1.5.2 or 1.8.8)? Are you trying to install a specific mod (like WorldEdit)? Are you on a school Chromebook or a personal PC?
I can give you more specific links or troubleshooting steps based on your setup. Eaglercraft Server Hosting: Fast Setup (2026) | Sealos Blog
How to Add Mods on EaglerCraft: A Step-by-Step Guide
EaglerCraft, a popular online Minecraft server, allows players to enhance their gaming experience with mods. Mods can add new features, gameplay mechanics, and items to the game, making it more exciting and engaging. In this article, we will guide you on how to add mods on EaglerCraft.
What are Mods and Why Do You Need Them?
Mods, short for modifications, are custom-made additions to the Minecraft game that can change or add new features, items, or gameplay mechanics. They can range from simple tweaks to complete overhauls of the game. Mods can enhance gameplay, add new content, or fix bugs, making the game more enjoyable and diverse.
Requirements for Adding Mods on EaglerCraft
Before you start adding mods, make sure you meet the following requirements:
- EaglerCraft Account: You need an active EaglerCraft account to access the server and install mods.
- Minecraft Client: You need a Minecraft client (version 1.8.9 or later) installed on your computer.
- Forge Mod Loader: EaglerCraft uses the Forge mod loader, so you need to have Forge installed on your client.
Step-by-Step Guide to Adding Mods on EaglerCraft
- Access the EaglerCraft Website: Log in to your EaglerCraft account on the official website.
- Go to the Mods Section: Click on the "Mods" tab on the top navigation bar.
- Browse Available Mods: Browse through the list of available mods, which are categorized for easy searching.
- Select a Mod: Choose a mod you want to install and click on it to view its details.
- Download the Mod: Click the "Download" button to download the mod file (usually a
.jarfile). - Install Forge: If you haven't already, install Forge on your Minecraft client. You can download it from the official Forge website.
- Create a Mods Folder: Create a new folder called
modsin your.minecraftdirectory (usually located atC:\Users\<YourUsername>\AppData\Roaming\.minecrafton Windows or~/Library/Application Support/minecrafton macOS). - Add the Mod to the Mods Folder: Place the downloaded mod file in the
modsfolder. - Launch Minecraft with Forge: Launch Minecraft with Forge by selecting the Forge profile in your Minecraft launcher.
- Join the EaglerCraft Server: Join the EaglerCraft server by clicking on the "Multiplayer" button and entering the server address.
- Verify the Mod: Once you're in-game, verify that the mod has been installed correctly by checking the mod list or using a mod-specific command.
Tips and Precautions
- Only download mods from trusted sources to avoid malware or viruses.
- Be cautious when installing multiple mods, as they may conflict with each other.
- Regularly update your mods to ensure compatibility with the latest EaglerCraft updates.
- Report any issues with mods to the EaglerCraft support team.
Conclusion
Adding mods on EaglerCraft can enhance your Minecraft experience and provide endless hours of entertainment. By following this step-by-step guide, you can easily install mods and start enjoying the benefits of a customized Minecraft experience. Happy modding!
Here’s a step-by-step guide to adding mods to Eaglercraft (the browser-based version of Minecraft): Adding mods to Eaglercraft is different from standard
Two main approaches
- Use a modded Eaglercraft client build (client-side mods).
- Use a mod-supporting Eaglercraft server or proxy (server-side mods).
How to Add Mods on Eaglercraft: The Ultimate Guide for 2024
Eaglercraft has taken the Minecraft community by storm. It is a groundbreaking recreation of Minecraft that runs directly in your web browser using JavaScript and WebGL, without requiring the official Java edition or a downloaded game client. This means you can play real Minecraft 1.8.8 or 1.12.2 on a Chromebook, a school computer, or any device with a browser.
One of the most common questions new players ask is: "Can I add mods to Eaglercraft?"
The short answer is yes, but not in the way you are used to with Java Forge or Fabric.
Because Eaglercraft is a reimplementation (not a port) of Minecraft, standard .jar mods will not work. However, Eaglercraft has its own unique modding ecosystem. This article will walk you through everything you need to know, from the basic limitations to the step-by-step methods of adding custom content, plugins, and "client-side" mods.
9. The Future of Eaglercraft Modding
The ecosystem is evolving fast. As of late 2024, a project called "EaglercraftX" (1.12.2 version) has introduced better modding APIs. Developers are working on:
- EaglerForge: A compatibility layer that would allow some Java mods to run (theoretically).
- EPK Mod Loader: A drag-and-drop system for
.epkfiles that contain custom assets and scripts. - Official Plugin Marketplace: A curated list of safe server plugins.
If you want to stay ahead, join the community Discord, learn basic JavaScript, and experiment with your own server.
Where to Find Eaglercraft Mods
- Official Discord – #mods channel
- GitHub – Search “eaglercraft mod”
- YouTube tutorials – Often include download links
How to Add Mods on Eaglercraft
Eaglercraft is a unique version of Minecraft that runs completely in a web browser using JavaScript and HTML5. Because it's not the standard Java Edition, you cannot install traditional Forge or Fabric mods. However, you can enhance Eaglercraft with client-side modifications — sometimes called "Eaglercraft mods" or "plugins" for the client.
Here’s how to do it:
Quick example: Installing a simple texture pack in a browser Eaglercraft build
- Download the browser bundle and unzip to a folder.
- Find the textures/ or assets/ folder.
- Replace the block textures PNGs with your PNGs (same filenames).
- Start a simple HTTP server in that folder:
- Python 3:
python -m http.server 8000
- Python 3:
- Open http://localhost:8000 in your browser and join a server that accepts that client build.
If you want, I can:
- Provide step-by-step edits for a specific Eaglercraft build if you share its file structure.
- Draft an install script or example manifest for a texture pack.
- Walk through creating a small client-side JS mod (give me the build type: browser bundle or standalone).
How to Add Mods on Eaglercraft: A Step-by-Step Guide
Eaglercraft is a popular online Minecraft server that allows players to enjoy a seamless and exciting gaming experience. One of the best things about Eaglercraft is its support for mods, which can enhance gameplay, add new features, and increase replayability. However, adding mods on Eaglercraft can be a bit tricky, especially for new players. In this article, we'll provide a step-by-step guide on how to add mods on Eaglercraft, so you can take your gaming experience to the next level.
What are Mods and Why Do You Need Them?
Mods, short for modifications, are custom-made additions to the Minecraft game that can change or add new gameplay mechanics, items, blocks, and features. Mods can range from simple tweaks to complete overhauls of the game, and they can be created by anyone with programming knowledge. Mods can enhance your gaming experience by adding new challenges, items, and features, making the game more exciting and engaging.
Preparation is Key
Before you start adding mods on Eaglercraft, make sure you have the following:
- A Eaglercraft account: If you don't have a Eaglercraft account, create one by going to the Eaglercraft website and following the registration process.
- Minecraft Forge: Minecraft Forge is a required tool for running mods on Eaglercraft. You can download Minecraft Forge from the official Minecraft Forge website.
- A modding platform: Eaglercraft supports mods through its built-in modding platform, but you can also use third-party modding platforms like OptiFine or MCP.
- Mods: Find the mods you want to add to your Eaglercraft experience. You can download mods from reputable modding websites like CurseForge, 9Minecraft, or Minecraft Forum.
Step 1: Accessing the Eaglercraft Mods Folder
To add mods on Eaglercraft, you need to access the mods folder. Here's how:
- Log in to your Eaglercraft account and go to the Eaglercraft dashboard.
- Click on the "Settings" icon (usually represented by a gear or cog).
- Scroll down to the "Advanced" section and click on "File Manager".
- Navigate to the "mods" folder. If you don't see the mods folder, create a new folder named "mods".
Step 2: Uploading Mods to Eaglercraft
Now that you have access to the mods folder, it's time to upload your mods:
- Download the mod(s) you want to add from a reputable modding website.
- Go back to the Eaglercraft mods folder and click on the "Upload" button.
- Select the mod file(s) you downloaded and click "Open".
- Wait for the mod(s) to upload. This may take a few seconds or minutes, depending on the size of the mod file(s).
Step 3: Activating Mods on Eaglercraft
After uploading your mods, you need to activate them:
- Go back to the Eaglercraft dashboard and click on the "Mods" tab.
- Find the mod(s) you uploaded and toggle the switch to "Enabled".
- Save your changes.
Step 4: Configuring Mods (Optional)
Some mods require configuration to work properly. If a mod requires configuration, you'll see a settings icon next to it:
- Click on the settings icon to access the mod's configuration page.
- Configure the mod according to its documentation or your preferences.
Step 5: Launching Eaglercraft with Mods
Now that you've added and activated your mods, it's time to launch Eaglercraft:
- Go back to the Eaglercraft dashboard and click on the "Play" button.
- Select the version of Minecraft you want to play (e.g., 1.19.2).
- Eaglercraft will launch with your mods enabled.
Troubleshooting Common Issues
Adding mods on Eaglercraft can sometimes be tricky, and issues may arise. Here are some common issues and their solutions:
- Mods not showing up: Make sure you've uploaded the mod(s) to the correct folder and that they're enabled in the Mods tab.
- Game crashes: Try disabling mods one by one to identify the problematic mod. You can also try reducing the mod's settings or updating Minecraft Forge.
- Mods not working: Check the mod's documentation or support page for troubleshooting guides.
Conclusion
Adding mods on Eaglercraft can enhance your gaming experience and provide hours of fun. By following this step-by-step guide, you can easily add mods to your Eaglercraft experience. Remember to always download mods from reputable sources, and be cautious when uploading mods to avoid potential issues. Happy modding!
Additional Tips and Resources
- Eaglercraft documentation: Check the official Eaglercraft documentation for more information on adding mods and troubleshooting common issues.
- Modding communities: Join modding communities like Minecraft Forum or Reddit's r/MinecraftMods for more information on mods and modding.
- Mod reviews: Check out mod reviews on CurseForge or 9Minecraft to find the best mods for your Eaglercraft experience.
By following this guide and taking advantage of additional resources, you'll become a modding pro in no time and enjoy a more exciting and engaging Eaglercraft experience.
To add mods to Eaglercraft , you generally cannot use standard Minecraft
files because Eaglercraft runs in a web browser using JavaScript. Instead, you must use specific mod loaders designed for this environment, like EaglerForge How to Add Mods Using EaglerForge
EaglerForge is the primary modding utility for Eaglercraft, allowing you to load custom scripts. Open a Modded Client : Use a version of Eaglercraft that supports EaglerForge. Access the Mods Menu button on the main menu or pause screen. Install the Mod From a URL
and paste the direct link (the "Raw" link from GitHub is often required) to the mod's Manual Upload to select a mod file directly from your computer. Confirm and Play
: Once added, the mod should be active in your current session. Clarification on "Paper" and Mods If by "paper" you are referring to the server software: Paper does not support mods : Paper only supports Server Setup
: To connect an Eaglercraft client to a Paper server, you must use a proxy like EaglercraftXBungee
. While the server itself won't have "mods" in the traditional sense, you can add server-side plugins to change gameplay. Eaglercraft on Paper : There is a specific EaglerXServer distribution
for Paper that supports EaglercraftX 1.8 and 1.12.2 clients. Helpful Resources EaglerForge Guide : Official step-by-step instructions for installing mods. EaglerForge Mod Repository : A collection of example mods like WorldEdit and Hat Mod. popular plugins compatible with an Eaglercraft-compatible Paper server? lax1dude/eaglerxserver - GitHub
To understand how to add mods to Eaglercraft properly, you have to understand the timeline. The "story" of Eaglercraft modding is a tragedy, a rebuild, and currently, a renaissance. EaglerCraft Account : You need an active EaglerCraft
Here is the proper story of how to mod Eaglercraft, moving from the lost era to the current working methods.